This is the third part of the Raspberry Pi Zero 2W-based Storage Server Shenanigans.
In this series, I’m transforming a Raspberry Pi Zero 2W into a super cheap storage server wannabe!
If you want to catch up on what I’ve done so far, check out the previous parts:
- P1: Custom Case & Hardware
- P2: Overclocking & Power Usage
- P3: Drive Performance (current)
- P4: mdadm & Samba
- P5: OpenMediaVault
I’ve also made a YouTube video that showcases the project:
Part Three: Drive Performance
In this blog post, I’m going to measure the read/write performance of the flash drives, so we have a point of comparison for RAID performance. I’m not expecting great results. These are, after all, four flash drives running through a USB hub on RPi Zero with USB 2.0 speeds. …but I’m gonna check it anyway.
As with the previous part, I’m writing this blog post as I go, to show you the exact commands I’m using and to spare myself from trying to remember how I did things later. That said, I don’t know the outcome yet, you’ll have to read along to see how it turns out.
The drives: base measurements
Let’s torment the drives to establish base performance, so we can later cry about how much we lost.
timax@pistorage:~ $ lsblk
NAME        MAJ:MIN RM   SIZE RO TYPE MOUNTPOINTS
sda           8:0    1  57.7G  0 disk
`-sda1        8:1    1  57.7G  0 part
sdb           8:16   1 230.5G  0 disk
|-sdb1        8:17   1   200M  0 part
`-sdb2        8:18   1 230.1G  0 part
sdc           8:32   1  57.7G  0 disk
`-sdc1        8:33   1  57.7G  0 part
sdd           8:48   1  57.7G  0 disk
`-sdd1        8:49   1  57.7G  0 part
mmcblk0     179:0    0  28.8G  0 disk
|-mmcblk0p1 179:1    0   512M  0 part /boot/firmware
`-mmcblk0p2 179:2    0  28.3G  0 part /
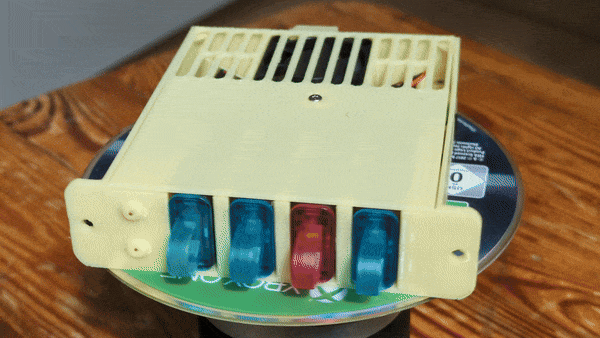
As you can see, all the flash drives are detected by the Pi and show up with sdX names. Three of them are 64GB, and one is 254GB. For our experiments, the fact that the last drive is larger doesn’t really matter for us, we’ll just be wasting a bunch of space.
Creating a partition and a filesystem
Let’s wipe the factory partition tables, create new ones, and format the drives as ext4. The commands I used were as follows:
sudo wipefs -a /dev/sd[a-d]
sudo parted /dev/sda mklabel msdos # repeat for other 3 drives
sudo parted -s /dev/sda mkpart primary ext4 0% 100% # repeat for other 3 drives
sudo mkfs.ext4 -F /dev/sda1 # repeat for other 3 partitions
Unfortunately, Bash’s filename expansion feature couldn’t be used for most of the commands.
Write speed tests
Let’s see how bad the drive speeds are and whether the results are consistent across all drives. The first thing we need to do is install fio.
sudo apt install fio
To test the drive speeds, I created a simple script that mounts each drive and runs the test using a 1 gigabyte file.
#!/bin/bash

for disk in /dev/sd?; do
    mount "${disk}1" /mnt || continue
    sleep 1
    echo "Testing ${disk}"
    fio --name=write_test --filename=/mnt/testfile --size=1G --bs=4k --rw=write --direct=1 --numjobs=1 --output-format=json
    sleep 1
    umount /mnt
done
I’ll be honest with you, this isn’t my first approach. Initially, I tried running the test in “time-based” mode for one minute, but the results varied a lot. Turns out, one minute isn’t long enough to reliably test drive speeds. So instead, I switched to using a 1 gigabyte file with no time limit. Now, let’s check the results.
| Drive | Run | Avgr. Write Speed (Megabytes per second) | 0.01% latency (ms) |
|---|---|---|---|
| /dev/sda | 1 | 1,931 | 442,50 |
| /dev/sda | 2 | 1,927 | 442,50 |
| /dev/sda | 3 | 1,936 | 442,50 |
| /dev/sdb | 1 | 3,862 | 2600,47 |
| /dev/sdb | 2 | 3,816 | 2600,47 |
| /dev/sdb | 3 | 3,897 | 2600,47 |
| /dev/sdc | 1 | 2,428 | 69,73 |
| /dev/sdc | 2 | 2,420 | 69,73 |
| /dev/sdc | 3 | 2,433 | 69,73 |
| /dev/sdd | 1 | 2,238 | 893,39 |
| /dev/sdd | 2 | 2,371 | 70,78 |
| /dev/sdd | 3 | 2,354 | 70,78 |
As you can see, I repeated the test three times. While the results within each drive are fairly consistent, the same can’t be said for results between different drives.
The table is simple to read. The “Run” column indicates the test number. The average write speed is shown in megabytes per second (based on the bw_bytes parameter from fio). The “0.01% Latency” column shows the latency in milliseconds for the slowest 0.01% of operations,it is taken from the 99.99th percentile in the fio output. In other words, it highlights the occasional “lag spikes” during writes.
The /dev/sdb drive (the 254GB one) has the highest write speed, but also the worst 0.01% latency.
Write speed experiment
I wanted to see if flash drive speed is somehow related to the slot on the USB hub the drive is connected to. So this is what I did…
As you probably know, drive names (sda, sdb, etc.) are dynamically assigned under Linux. So when the Pi boots with drives attached, there’s no guarantee that the drive in bay 0 ends up as sda, and so on. To make sure the drive bay matched the device letter, I unplugged all the drives and plugged them in one by one, always checking that each drive was assigned the next letter in order.
I ran the test twice. First, with the highest capacity drive plugged in first, then again with the order reversed, so the highest capacity drive became the last one. In both cases, I made sure that drive letters corresponded to the bay number.
Let’s look at the results.
| Drive | Run | Avgr. Write Speed (Megabytes per second) | 0.01% latency (ms) |
|---|---|---|---|
| /dev/sda | 1 | 2,365 | 70,78 |
| /dev/sda | 2 | 3,730 | 2600,47 |
| /dev/sdb | 1 | 2,387 | 69,73 |
| /dev/sdb | 2 | 1,934 | 442,50 |
| /dev/sdc | 1 | 1,929 | 442,50 |
| /dev/sdc | 2 | 2,386 | 68,68 |
| /dev/sdd | 1 | 3,929 | 2600,47 |
| /dev/sdd | 2 | 2,351 | 70,78 |
Wow, I did not expect this to be honest. I thought the flash drive’s position in the hub might have some effect but it seems that’s not really the case. Or at least, not enough to make a meaningful difference.
You can clearly differentiate the drives just by looking at the results.
Read speeds
Let’s quickly check how the performance looks for reads.
| Drive | Run | Avgr. Write Speed (Megabytes per second) | 0.01% latency (ms) |
|---|---|---|---|
| /dev/sda | 1 | 6,651 | 31,85 |
| /dev/sda | 2 | 6,617 | 31,85 |
| /dev/sda | 3 | 6,565 | 31,85 |
| /dev/sdb | 1 | 7,256 | 1,89 |
| /dev/sdb | 2 | 7,258 | 1,70 |
| /dev/sdb | 3 | 7,262 | 1,55 |
| /dev/sdc | 1 | 6,401 | 2,09 |
| /dev/sdc | 2 | 6,401 | 2,11 |
| /dev/sdc | 3 | 6,404 | 2,04 |
| /dev/sdd | 1 | 6,389 | 1,09 |
| /dev/sdd | 2 | 6,386 | 1,52 |
| /dev/sdd | 3 | 6,391 | 1,45 |
One thing can be said for sure, the latency results are much better. Read speeds also look noticeably more consistent compared to the write tests.
Extra – Omni Drive – DM device
Before I continue with setting up RAID, let’s have a bit of fun and create a so-called dm-device. The device mapper allows for creating logical volumes from physical storage media.
Creating the device
In this test, I’ll create a single logical storage device out of all the flash drives. Let’s give it a try.
First, let’s yeet the partition tables from all the flash drives.
timax@pistorage:~/scripts $ sudo wipefs /dev/sd* --all
/dev/sda: 2 bytes were erased at offset 0x000001fe (dos): 55 aa
/dev/sda1: 2 bytes were erased at offset 0x00000438 (ext4): 53 ef
/dev/sdb: 2 bytes were erased at offset 0x000001fe (dos): 55 aa
/dev/sdb1: 2 bytes were erased at offset 0x00000438 (ext4): 53 ef
/dev/sdc: 2 bytes were erased at offset 0x000001fe (dos): 55 aa
/dev/sdc1: 2 bytes were erased at offset 0x00000438 (ext4): 53 ef
/dev/sdd: 2 bytes were erased at offset 0x000001fe (dos): 55 aa
/dev/sdd1: 2 bytes were erased at offset 0x00000438 (ext4): 53 ef
/dev/sda: calling ioctl to re-read partition table: Success
/dev/sdb: calling ioctl to re-read partition table: Success
/dev/sdc: calling ioctl to re-read partition table: Success
/dev/sdd: calling ioctl to re-read partition table: Success
Next, we need to get the sector sizes for each drive. Notice how one of the 64GB drives has an extra sector.
timax@pistorage:~/scripts $ sudo blockdev --getsz /dev/sd*
121077760
121077760
121077761
483321640
The next step is to create the DM device. While the mapping table can be specified directly when calling dmsetup, a much cleaner approach is to write the table into a file and then pass it to dmsetup. That’s exactly what I did.
timax@pistorage:~/scripts $ cat dm-device.table
0 121077760 linear /dev/sda 0
121077760 121077760 linear /dev/sdb 0
242155520 121077761 linear /dev/sdc 0
363233281 483321640 linear /dev/sdd 0
timax@pistorage:~/scripts $ sudo dmsetup create omni_drive < dm-device.table
…and that, ladies and gentlemen, is how I created the OMNI DRIVE.
timax@pistorage:~/scripts $ lsblk
NAME         MAJ:MIN RM   SIZE RO TYPE MOUNTPOINTS
sda            8:0    1  57.7G  0 disk
`-omni_drive 254:0    0 403.7G  0 dm
sdb            8:16   1  57.7G  0 disk
`-omni_drive 254:0    0 403.7G  0 dm
sdc            8:32   1  57.7G  0 disk
`-omni_drive 254:0    0 403.7G  0 dm
sdd            8:48   1 230.5G  0 disk
`-omni_drive 254:0    0 403.7G  0 dm
Speed tests
I reran the speed test for the DM device, and here are the results:
| Direction | Avgr. Write Speed (Megabytes per second) | 0.01% latency (ms) |
|---|---|---|
| Write | 2,036 | 893,38 |
| Read | 6,22 | 1,49 |
The way the DM device is set up right now, it should be performing operations on only one drive at a time, so it doesn’t surprise me that we’re getting similar results. I suppose the performance would vary depending on which drive the DM device happens to be reading from or writing to at that moment.
Let’s break it
Wanna know what happens if we remove one of the drives? Me too. Let’s pull out one of the middle drives and see if we can still write to the partition.
I removed one of the drives and attempted some operations.
timax@pistorage:/mnt $ lsblk
NAME            MAJ:MIN RM   SIZE RO TYPE MOUNTPOINTS
sda               8:0    1  57.7G  0 disk
`-omni_drive    254:0    0 403.7G  0 dm
  `-omni_drive1 254:1    0 403.7G  0 dm   /mnt
sdb               8:16   1  57.7G  0 disk
`-omni_drive    254:0    0 403.7G  0 dm
  `-omni_drive1 254:1    0 403.7G  0 dm   /mnt
sdd               8:48   1 230.5G  0 disk
`-omni_drive    254:0    0 403.7G  0 dm
  `-omni_drive1 254:1    0 403.7G  0 dm   /mnt
mmcblk0         179:0    0  28.8G  0 disk
|-mmcblk0p1     179:1    0   512M  0 part /boot/firmware
`-mmcblk0p2     179:2    0  28.3G  0 part /
timax@pistorage:/mnt $ sudo touch grass
timax@pistorage:/mnt $ ls
grass  lost+found  testfile
Surprisingly, the DM device still seems to be operational. Let’s plug the drive back in.
timax@pistorage:/mnt $ lsblk
NAME            MAJ:MIN RM   SIZE RO TYPE MOUNTPOINTS
sda               8:0    1  57.7G  0 disk
`-omni_drive    254:0    0 403.7G  0 dm
  `-omni_drive1 254:1    0 403.7G  0 dm   /mnt
sdb               8:16   1  57.7G  0 disk
`-omni_drive    254:0    0 403.7G  0 dm
  `-omni_drive1 254:1    0 403.7G  0 dm   /mnt
sdd               8:48   1 230.5G  0 disk
`-omni_drive    254:0    0 403.7G  0 dm
  `-omni_drive1 254:1    0 403.7G  0 dm   /mnt
sde               8:64   1  57.7G  0 disk
mmcblk0         179:0    0  28.8G  0 disk
|-mmcblk0p1     179:1    0   512M  0 part /boot/firmware
`-mmcblk0p2     179:2    0  28.3G  0 part /
After plugging the drive back in, it’s no longer recognized as part of the DM device. Now for a final test, let’s remove the first drive. I assume we’ll see files disappear, as they should be stored on that first drive. Additionally, I’d expect we won’t be able to write anything anymore, since the partition table is probably stored there too. …or maybe that’s not the case for a device that’s already mounted. Let’s find out.
timax@pistorage:/mnt $ sudo touch hmm
touch: cannot touch 'hmm': Input/output error
timax@pistorage:/mnt $ ls
grass  lost+found  testfile
After removing the first drive, I can no longer write anything to the device.
Summing it up
In this blog post, I managed to measure the read/write performance of the drives, which will serve as a baseline for upcoming RAID tests. I also confirmed that, despite the drives being from the same brand and (most of them) having the same capacity, their performance varies and, interestingly, those differences are consistent.
In the next post, we’ll set up a basic storage server using mdadm and Samba, explore available RAID levels and their performance, and finally, test transfer speeds over the network.